I've been doing more and more custom Di2 installs recently on standard frames not designed for Di2. I thought I would share a few tips I've picked up along the way that might make it easier for someone considering electronic shifting or installing it for the first time.
 |
| Shimano PC linkage firmware updater tool |
This process is for the newer Di2 using the E-wire system, but is similar for the first generation Di2 Dura ace stuff. The first step is to update all the firmware and make sure everything works. I learned this lesson the first time I was putting together an 11 speed Dura Ace group that we had purchased from several different sources. Basically, no matter what combination of what parts I used, nothing worked. A quick call to Shimano tech support and we found that the firmware had to match (be the latest version) in order for all the parts to communicate and work correctly. In no time, we had our PC linkage device on the way. The PC linkage device is the tool that plugs into your PC and Updates firmware, as well as diagnose problems.
 |
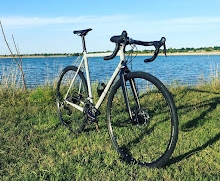
My buddy Andy's Velocite Magnus
|
We would be swapping a Di2 Ultegra group on a bike currently with 2011 Sram Red components.
 |
| Di2 parts kit. |
Since we were using the internal seat post battery, the charger in the upper right hand corner wasn't needed. We did need an additional 2 wires (6 total are needed for road bikes). The wires come in several different lengths to work with the application, frame size, configuration ETC.
 |
| You can update the firmware on 2 things at one time. The shifters are counted as 1 item |
 |
| I stared with the battery and the 5 port junction box with the shifters. |
 |
| The firmware update process is really pretty simple and easy to follow. Here is a visual of the program checking the current firmware. |
 |
| Current version and new version to be updated to. |
 |
| Next I did the derailleurs |
The biggest challenge of this project was the frame construction. Most carbon fiber frames are a monocoque type construction. This frame has a solid BB shell with the down tube, seat tube, and chain stays butted directly against the BB, so I had to drill some holes in the BB shell.
 |
| Seat tube and down tube holes. I used a dremel tool to enlarge the down tube hole to a rectangular shape just big enough to get the 4 port junction box through. |
 |
| Drive side chain stay and seat tube holes |
 |
| Rear chain stay exit. I used 4 drill bits starting with 1/8" and ending up with 1/4" holes. It seems to work best to start with a small hole and gradually enlarge it. |
The chain stay routing was by far the most difficult. After drilling the holes, I found the tube was full of bladder material, which had to be dug out. My
easy to route tool worked well to get all the wires through the frame.
 |
| Top tube entry hole. Wire runs through the head tube to the down tube. |
 |
| Wire running up through the seat tube to be connected to the battery. |
 |
| The bike is complete! |
 |
| Top tube wire is barely noticeable. The 5 port junction box is mounted under the stem. The small square at the back of the box is the cover to charge the battery. |
 |
Front derailleur routing.
|
I was curious about how the front derailleur would work with the 2012 Sram Red yaw chain rings, but the Ultegra derailleur adjusted to them just fine.